Darkplaces lighting/Lighting model
m (→Shadow mapping) |
|||
| Line 16: | Line 16: | ||
* Color Map : base texture (best way to use [[diffuse]] texture) | * Color Map : base texture (best way to use [[diffuse]] texture) | ||
* Normal Map : texture storing additional surface curvature (optionally, alpha storing height) | * Normal Map : texture storing additional surface curvature (optionally, alpha storing height) | ||
| − | * Gloss Map : texture used for specular | + | * Gloss Map : texture used for specular reflection. Contains gloss color (RGB) and optional exponent multiplier (alpha) |
* Glow Map : texture's local luminance texture, RGB additive blended texture that entirely ignores shading | * Glow Map : texture's local luminance texture, RGB additive blended texture that entirely ignores shading | ||
* Light Vector : vector of light direction (either calculated for realtime light or got from deluxemap [[lightmap]] component) | * Light Vector : vector of light direction (either calculated for realtime light or got from deluxemap [[lightmap]] component) | ||
Latest revision as of 12:50, 15 February 2013

Darkplaces uses a variation of Phong shading as a default lighting model. It is based on per-pixel lighting - a technique of computing lighting equations for each pixel independently. Renderer contains lots of tricks to allow shading to be fast and flexible. Default model is used on both GL2.0 rendering paths and pre-shader rendering paths (GL1.4), although not all lighting features are possible on pre-shader fixed rendering pipeline.
Lighting are breaked into the passes:
- Static lighting (lightmap or lightgrid or vertex lighting)
- Dynamic light 1
- Dynamic light 2
- ...
- Dynamic light X
- Photon Mapping (optional)
- Fog (optional)
Data used for each light pass:
- Vertex normal : values between vertices of pixel's triangle are interpolated using Gouraud shading
- Color Map : base texture (best way to use diffuse texture)
- Normal Map : texture storing additional surface curvature (optionally, alpha storing height)
- Gloss Map : texture used for specular reflection. Contains gloss color (RGB) and optional exponent multiplier (alpha)
- Glow Map : texture's local luminance texture, RGB additive blended texture that entirely ignores shading
- Light Vector : vector of light direction (either calculated for realtime light or got from deluxemap lightmap component)
- Eye Vector : being computed for each pixel, this vector is used for specular calculation.
This gallery illustrates how lighting features changes the quality:
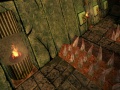
Attenuation-only 'flat' lighting
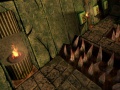
+ Shadows
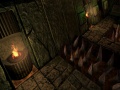
+ Shading
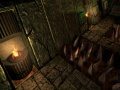
+ Specular
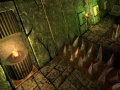
+ Photonmapping


[edit] Attenuation
Dynamic lights in Darkplaces engine are omnidirectional, using linear falloff.
Static lights can have a variety of options for controlling attenuation (this options is only used in Q3map2 LIGHT stage):
- target and radius : simulating spot lights with cone falloff
- _sun flag - infinite distance lights, constant direction
- _deviance and _samples - non-point lights
[edit] Shading
Shading is done by using dotproduct of light vector and pixel normal. Some ambient lighting could be added for a more smooth result.
Rough shading algorithm explanation:
// Surface's vertex normals are always supplied, texture normalmap is forced to default RGB '0.5 0.5 1' (same as surface normal) if not found
PixelNormal = Surface.VertexNormal + Texture.NormalMap;
// LightSource are only defined for dynamic lights
// LightmapGlobal.AmbientLight is r_ambient cvar
// Material.AmbientLight is set by dprtlightambient material keyword and only applicable to dynamic lights
AmbientLight = LightSource.AmbientLight + LightmapGlobal.AmbientLight + Material.AmbientLight;
if (LightSource)
    DiffuseLight = LightSource.DiffuseLight;
else
    DiffuseLight = 1; // Static lighting
Shading = dotproduct(PixelNormal, LightVector) * DiffuseLight + AmbientLight;
[edit] Specular
Specular (or gloss) is the mirror-like reflection of light from a surface, in which light from a single incoming direction (a ray) is reflected into a single outgoing direction. Many well-known surfaces (metal, plastic, wood) is recognized by specularity they have.
Specular offers two parameters to mess with:
- Specular multiplier: intensity of specular effect, this could be very high or very low. It is multiplier to gloss texture.
- Specular exponent: how 'sharp' gloss is, high values are used to make texture to be plastic-like, while lower ones are suitable for matte surfaces. Basically its just a modifier to gloss texture's alpha channel (which is forced to 1 if not supplied).
Gloss may be forced (see r_shadow_gloss 2 below), in this case texture, if missing its own gloss map, gets a white image for gloss map and parameters from a cvars.
Rough specular algorithm explanation:
// Global.GlossIntensity is controlled by r_shadow_glossintensity or r_shadow_glossintensity2 if gloss is forced
// Material.GlossIntensityMod is set by dpglossintensitymod material keyword
SpecularColor = Texture.GlossMap * Global.GlossIntensity * Material.GlossIntensityMod;
// Global.GlossExponent is controlled by r_shadow_glossexponent or r_shadow_glossexponent2 if gloss is forced
// Material.GlossExponentModis set by dpglossexponentmod material keyword
if (Texture.GlossMap.Alpha)
    SpecularExponent = Texture.GlossMap.Alpha * Global.GlossExponent * Material.GlossExponentMod;
else
    SpecularExponent = Global.GlossExponent * Material.GlossExponentMod;
// this is rough specular calculation
// optionally, engine can use real reflection map to get specular normal (see r_shadow_glossexact below)
SpecularNormal = PixelNormal + EyeVector;
Specular = SpecularColor * power(dotproduct(PixelNormal, SpecularNormal), SpecularExponent)
[edit] Shadows
Shadows are most valuable part of realtime lighting. They are increasing scene depth so it looks more realistic.
Darkplaces supports two realtime shadowing techniques: stencil shadow volumes and shadow mapping.
[edit] Stencil shadow volumes
Stencil shadow volumes is a base shadow rendering method in Darkplaces.
This technique is well known for it's shadows not having penumbra. Many other restrictions (high fillrate hit, bad scalability) make this method to be used only on a few games (such as Doom 3).
[edit] Shadow mapping
In 2010 darkplaces got shadow mapping implemented by Eihrul.
Shadowmapping have a number of advantages over shadow volume rendering and is considered to replace it:
- Penumbra
- Fast to render (especially on complex area maps)
- Takes less CPU time (as construction of shadow volumes is not required)
- Distance-based LOD (far lights rendered with lower shadowmap resolution)
[edit] Other light models
Darkplaces includes other lighting models which are used eventually:
Fake light
- A developer-only mode which is forced on non-lit maps (ones which was compiled and didnt get LIGHT phase). This is infinite realtime light that is cast from eye position.
Sun light
- A similar to fake light technique to render sun lighting on outdoor surfaces, Used for sunset and sun dawn effects on outdoor maps.
Cel shading
- Altered shading for default lighting model.
 r_celshading : Enable cel shading (alternate diffuse math)
Lightmap
- Lightmap with no deluxemap applied (just an old lightmap with no per-pixel lighting effects)
Fullbright
- No lighting applied (all textures at their full brightness)
Next chapter: Special effects
Back to index | Top of the page